


How to Wash and Dry Salad Greens to Keep Them Crisp
wash and dry salad greens to keep them crisp is essential for those who value freshness and flavor. Did you know that improperly handled greens can lose up to 40% of their crispness in a few hours? This guide explains how to effectively wash and dry your salad greens to maintain their ideal texture. From the soaking techniques to drying tips, you’ll find everything you need to ensure your salads are always vibrant and crunchy. Keep reading to make sure that your greens offer the perfect bite every time.
“`html
Importance of Washing and Drying Salad Greens
Washing and drying salad greens might seem like an extra step, but it’s crucial for both health and taste. Ensuring that greens are clean can prevent unwanted contaminants from entering your diet. Additionally, a good wash brings out the vibrant flavors of your greens, making your salads more enjoyable.
Why Clean Salad Greens Matter for Health
Salad greens are a staple in many healthy diets, yet they can harbor harmful bacteria like E.coli or Salmonella. These pathogens pose a significant health risk, especially when greens are consumed raw. Washing greens helps reduce these risks by physically removing bacteria and other pathogens.
Beyond bacteria, greens can also be exposed to pesticides and fertilizers during farming. These chemicals can linger on leaves, posing potential health issues over time. Regularly washing your salad greens minimizes your exposure to these unwanted substances, promoting a healthier diet.
Moreover, clean greens contribute to better digestion. Small soil particles or plant debris can cause discomfort if ingested. Rinsing them well ensures that each bite is as safe and pleasant as possible.
Removing Chemicals and Dirt from Fresh Produce
Fresh produce often looks clean at first glance, but appearances can be deceiving. Chemicals used during farming can cling stubbornly to the surface of leaves. Dirt and sand, common in leafy greens, are often deeply embedded and require thorough washing to remove.
Rinsing greens under running water is a simple yet effective method. Gently rubbing the leaves can dislodge any stubborn dirt or residue. For a deeper clean, a mild vinegar solution can be used to help break down and remove chemical residues.
Proper washing not only removes these contaminants but also extends the shelf life of your greens. Clean greens are less likely to decay quickly, helping you enjoy fresh salads for longer periods.
Enhancing Freshness and Flavor with Proper Cleaning
Dirty greens can mask the natural flavors of your salad. Proper washing elevates the taste of the leaves, allowing their true flavors to shine. When greens are clean, they provide a crisp, refreshing bite that enhances the overall salad experience.
The process of washing also rejuvenates wilted greens. When soaked in water, leaves regain some of their lost moisture, making them crisper and more appealing. This step can be particularly beneficial when using greens that have been stored for a few days.
Ultimately, clean greens are not just about safety — they are about savoring each bite. Enjoying the pure, untainted flavors of your greens can transform an ordinary salad into a delightful culinary experience.
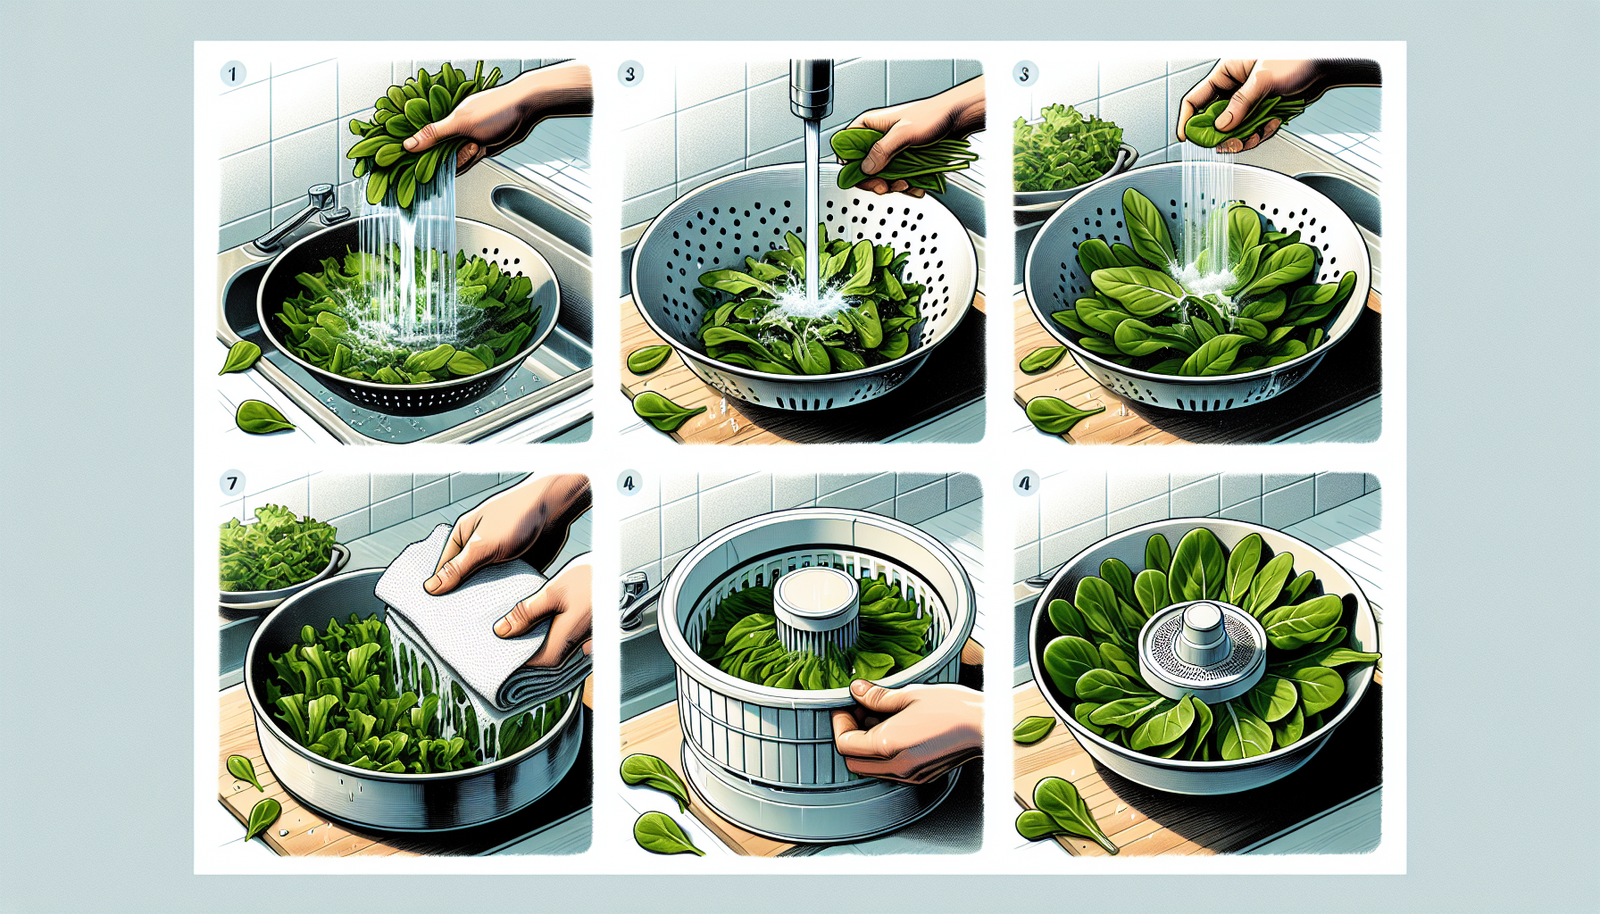
Step-by-Step Guide to Washing Salad Greens
Washing salad greens doesn’t have to be a chore. With the right methods and tools, it becomes a simple task that ensures your greens are ready for consumption. This guide will walk you through each step, making the process easy and effective.
Best Methods to Rinse Greens Thoroughly
Rinsing greens properly is key to removing dirt and contaminants. Start by separating the leaves and placing them in a large bowl. Fill the bowl with cold water, allowing the leaves to soak briefly. Swirl them gently with your hands to dislodge any dirt.
Next, lift the greens from the water, allowing dirt and sand to settle at the bottom of the bowl. Repeat this process with fresh water until no debris remains.
For an extra layer of cleanliness, consider using a vinegar solution. Mix one part vinegar with three parts water and soak the greens for a few minutes. This can help remove any residual pesticides or bacteria.
Tools and Equipment for Efficient Salad Cleaning
The right tools make salad cleaning a breeze. A large bowl or basin provides ample space for washing, while a colander or salad spinner aids in rinsing and draining. A salad spinner is especially useful for drying, as it removes excess water quickly without damaging the leaves.
For those without a salad spinner, a clean dish towel can also be effective. After washing, spread the greens on the towel and pat them dry gently. This method requires a bit more patience but works well in a pinch.
Having these tools on hand simplifies the process, ensuring your greens are clean and ready for any dish.
How to Handle Fragile Greens to Avoid Damage
Fragile greens like arugula or spinach require gentle handling to prevent bruising. When washing, avoid vigorous scrubbing which can tear delicate leaves. Instead, opt for a gentle swirling motion in water.
After rinsing, handle the greens with care. Avoid squeezing or pressing them, as this can damage their structure and impact their texture. If using a salad spinner, do not overload it. Allow enough room for the greens to spin freely without getting crushed.
Caring for fragile greens ensures they remain intact and appetizing, enhancing the visual and textural appeal of your salad.
Drying Techniques for Crisp Salad Greens
Proper drying is essential for achieving crisp, fresh salad greens. Wet leaves can lead to a soggy, unappealing salad. Using effective drying techniques can make a big difference in the final dish. Here’s how you can keep your greens crisp and delicious.
Manual Drying Methods for Crisp Leaves
Manual drying is a simple way to ensure leaves are moisture-free. After washing, lay the greens out on a clean, dry towel. Gently pat them with another towel to absorb excess water. This helps avoid wilting and maintains the leaves’ crispness.
Another method involves rolling the greens in a towel. Spread them evenly over the towel, then roll it up like a jelly roll. Press lightly on the rolled towel to squeeze out extra water, being careful not to crush the greens.
This hands-on approach is effective and requires no special equipment, making it accessible for everyone.
Using a Salad Spinner for Fast Drying
A salad spinner is a quick, efficient tool for drying greens. After washing, place the leaves in the spinner basket. Secure the lid and spin until most of the water is removed.
Salad spinners work by using centrifugal force to expel water, leaving your greens crisp and ready to serve. They are particularly useful when preparing salads in large quantities, saving time and effort.
For best results, avoid overcrowding the spinner. Spinning too many greens at once can lead to uneven drying and bruising.
Storage Tips to Maintain Crispness and Freshness
Proper storage extends the life of your greens. After drying, place the greens in a breathable container or a loosely closed plastic bag. Adding a dry paper towel can help absorb residual moisture.
Store the container in the refrigerator’s crisper drawer. This area maintains optimal humidity, preserving the greens’ texture and flavor. Avoid storing greens in the back of the fridge, where temperatures can fluctuate.
Eat washed and dried greens within a few days for the best taste and texture. Following these storage tips keeps your salads fresh and delightful.
“`
This content is structured to guide readers through the process of washing, drying, and storing salad greens effectively. Each section is designed to be informative and engaging, maintaining the reader’s interest throughout.
Conclusion
Washing salad greens involves rinsing them under cold water to remove dirt and bacteria. It’s important to handle them gently to avoid bruising. Drying can be done using a salad spinner, paper towels, or a clean kitchen towel. Ensuring the greens are dry helps dressing adhere better and keeps the leaves crisp. Proper storage in the refrigerator extends their freshness.
“`html
FAQ
How do you properly wash and dry salad greens to ensure they are clean?
Start by filling a large bowl with cold water. Submerge the greens, gently agitating them to loosen dirt and debris. Let them sit for a few minutes, allowing any grit to settle at the bottom. Carefully lift the greens out and transfer them to a clean colander or salad spinner.
What are the best methods for drying salad greens after washing?
A salad spinner is ideal for drying greens. It spins away excess water, leaving them crisp and ready to eat. If you don’t have a salad spinner, lay the greens on a clean kitchen towel or paper towels. Pat them dry gently to avoid bruising.
Can washing salad greens remove all pesticide residues effectively?
Washing salad greens under running water can significantly reduce pesticide residues but may not remove them entirely. Using a produce wash or vinegar solution can enhance cleaning, though rinsing with plain water is often sufficient for reducing most residues.
How long can washed and dried salad greens be stored in the refrigerator?
Once washed and thoroughly dried, salad greens can be stored in the refrigerator for up to a week. Place them in a container lined with paper towels to absorb any excess moisture, helping keep them fresh longer.
What tools or equipment are recommended for washing and drying salad greens?
A salad spinner tops the list for efficiently washing and drying greens. A large bowl for initial washing, a colander for draining, and clean towels for drying are also useful. These tools help maintain the freshness and texture of the greens.
Are there any natural alternatives to use for washing salad greens besides water?
Vinegar and lemon juice are popular natural alternatives. Mix either with water as a cleaning solution. This method can help remove more residues and bacteria while maintaining the greens’ natural flavor.
“`